Editing Scenarios
Instead of requiring users to write directly in an XML format, MORAI Scenario Runner provides a graphical user interface for easy, intuitive editing of different scenarios.
Creating the Elements
The basic functionality of creating the elements would be how to place the scenario objects (vehicle, pedestrian, miscellaneous) on the Map as well as how they behave in a certain condition.
Scenario Objects
There are two ways to create scenario objects (vehicle, pedestrian, miscellaneous); one is to use the main menu and click the link on Map. The detailed instructions are as follows.
1. Using the Main Menu
Vehicle (Ego or NPC) can be created through Edit >> Add Scenario Objects >> Vehicle
Then, create the vehicle by filling out the vehicle’s name, model, type, initial speed, and position.
Location information can be entered in four formats: World Position, Link Position, Relative World Position (orientation=absolute), and Relative Object Position (orientation=absolute). When entering using Link Position, the vehicle's heading is automatically set.
Additionally, optional settings are provided for the Vehicle Property defined by MORAI: Check TL (Traffic Light) and Apply ACC (Adaptive Cruise Control). This allows the vehicle to perceive traffic lights and maintain a distance from the preceding vehicle.
Also, pedestrian and miscellaneous objects can also be created using the same way.
2. Creating the scenario objects via clicking the Link point on the map
Click the
LINKonData View (top-left), then place the scenario objects in a certain position by using the keyboard (up & down).
Using the right-click on the link point, scenario objects can be placed using the submenu name called
Add Scenario Objects. In this case, the initial position is already set as corresponding to the point on the Map Data as shown below.Entities in Data View can be created as Scenario Objects through right-clicking with the mouse
When created using this method, the vehicle's speed and position need to be added separately (refer to the example below)
After selecting Entities in Data View, right-clicking enables the creation of Scenario Objects using the Add Entity Wizard as shown below
While it may appear similar to the Add_Scenario_Objects UI, you cannot set the speed and position values for the corresponding vehicle. In Entity Type, you can specify the type of Scenario Object (Vehicle / Pedestrian / MiscObject).
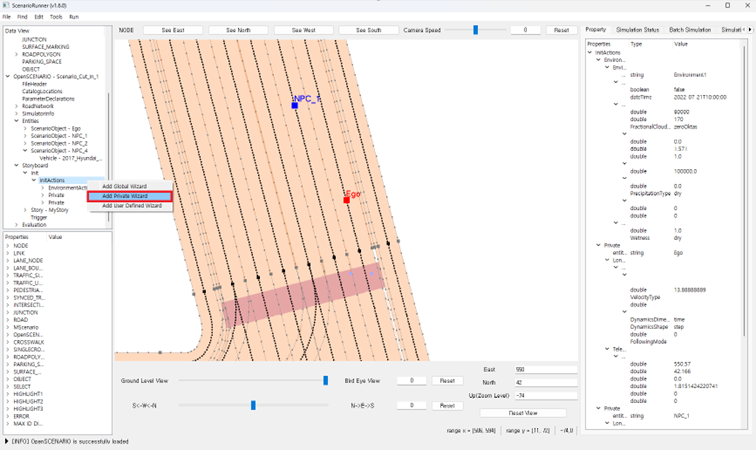
To input information such as the position or speed (excluding MiscObject) of Vehicle/Pedestrian/MiscObject later, you need to create a private action for the corresponding entity in Data View. To do this, right-click on Storyboard > Init > InitActions in the Data View, and create the private action for the respective entity.

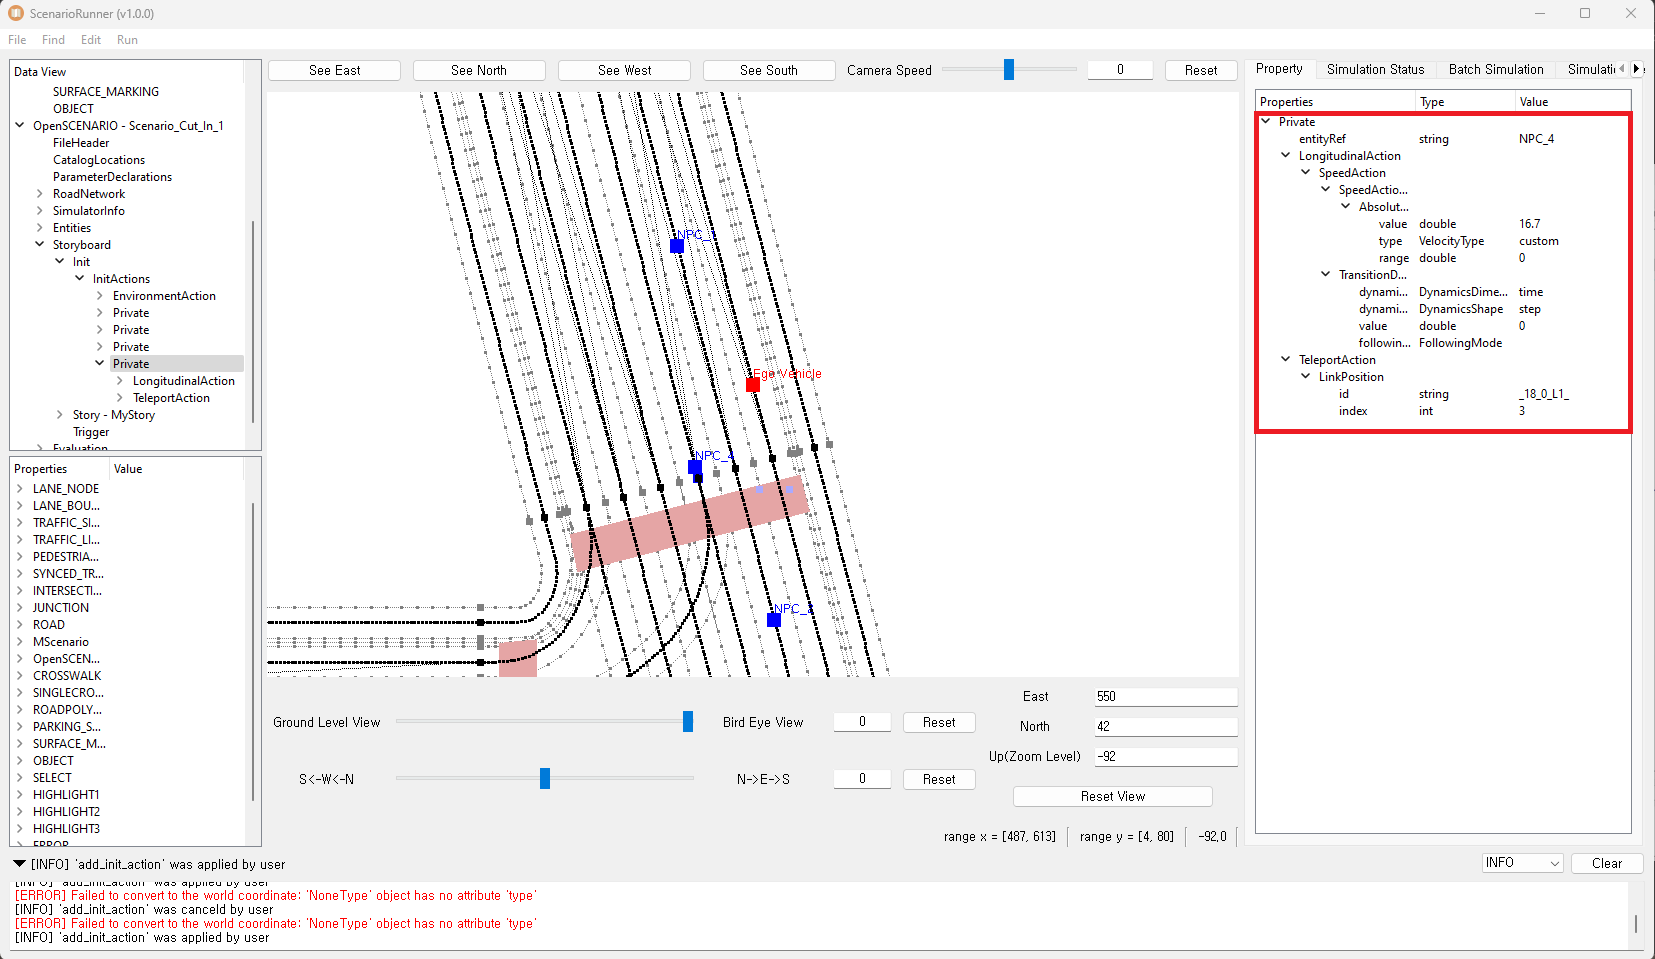
As shown below, clicking on Entity Ref allows you to view the current list of Scenario Objects. By clicking on NPC_4, created in the example above, you can set the speed and position of NPC_4.
The 'Type' under SpeedActionTarget is divided into two categories: Link and Custom. For Link, you can input a value in the range scaled based on the speed limit of that link. For Custom, you can set the speed independently of the link speed.
To set the initial position of NPC_4 in the Entity Wizard

To set the initial speed and position of NPC_4, view the results screen.
Generate Event
It is also important to control how the scenario objects behave in a certain condition, and that’s what the Event element allows the user to create the dynamic scene.
1. Creation through the Event UI
The Event element can be created using the Event UI through the Edit >> Add Event.
After filling out all the information required to create the Event, a new Event is created as shown on the
Data View (top-left). The event mainly complies with the ASAM OpenSCENARIO, and further details are available on this page: OpenSCENARIO Support
Scenario: When NPC_2 vehicle finished changing the lane (MyEvent changes the state to CompleteState),
NPC_1 will stop for 5 secs.
Completed creating a new event element
2. Event creation through right-clicking on Maneuver in Data View
To create the desired event, right-click on the corresponding Maneuver, and click on 'Add Event' through the right-click menu.
You can see that the Event element has been created as shown below. When creating an Event element using this method, you can check in the right Property View that the values of attributes inside the Event are stored as default (unspecified), and you can modify the displayed attributes.
If you want to add elements (Action, Trigger) inside an Event, you can right-click on the desired Event under the 'Event' section to add Action and StartTrigger. Additionally, you can see the newly created Event Element for the Actor (NPC_2) inside MyManeuverGroup, as shown below.
You can create the longitudinal action > SpeedAction element for the corresponding Event using the Action Wizard, as shown below.
Similar to adding an Action above, you can create a ConditionGroup element through the 'Set Trigger' to add a Condition element. To create a ConditionGroup afterward, right-click on the Trigger element and select ‘Add ConditionGroup’
After right-clicking on ConditionGroup, clicking on 'Add Condition Wizard' in the submenu will bring up the screen where you can set the Condition element, as shown below.
Editing the Element attributes
On the
Data View (top-left), click the element or its parent element that includes the attributes.Then,
Property Viewshows the attributes of elements as well as its child element.
Double click the attributes you would like to edit on
Property ViewOnce you edit the value in that element on the pop-up, click ‘ok’ as shown below
The Enumeration Types defined in OpenScenario are presented in the UI form of a ComboBox.
Delete Element
In the left Data View, right-click on the element you want to delete, and then click the Delete button.
Press OK in the delete confirmation popup to remove the element
If you attempt to delete an element that cannot be deleted, the command will be ignored, and a log will be outputted at the bottom. (Deletion is not possible when a higher-level element requires the presence of the lower-level element.)
Editing Vehicle Trajectory
The vehicle or pedestrian route is also an important factor in OpenSCENARIO, this will enable vehicles to travel within the route as well as reach a specific position.
Editing Trajectory
Trajectory represents the movement path of a vehicle or pedestrian and can take various mathematical shapes.
Mathematical shapes are divided into three types: Polyline, Clothoid, and Nurbs.
When defining the trajectory that a vehicle or pedestrian will follow, these shapes can be utilized. (Currently, only Polyline is supported, and Clothoid and Nurbs are not supported.)
To use Follow Trajectory, both the trajectory and timing need to be edited.
The behavior of the trajectory is defined along with time (TimeReference) information.
When TimeReference is specified as Timing, it can store the arrival time for each point (Vertex) in both Absolute and Relative terms.
In the case of Absolute, it signifies the time each point must be reached, while in the case of Relative, it expresses the relative time between each point.
Morai has a Defined & Custom Element known as Spline.
For a Spline, values are received in terms of angle and position (Vertex).
https://releases.asam.net/OpenSCENARIO/1.0.0/Model-Documentation/content/FollowTrajectoryAction.html
Creating the Trajectory
If the vehicle is already placed at the starting location, you can skip the 'Set Start Location' step
To set the route, click the
Privateelement associated with that Trajectory and the vehicle.Select the point at which the vehicles start driving by using the keyboard input (up/downs) after clicking the link.
By right-clicking on that point, click the
Set Start Location
Once the vehicle’s initial position is set, setting the start location is unnecessary.
Similarly, after selecting the desired destination, right-click and click on 'Add Waypoints'
By adding waypoints in the same manner, the previously added waypoints become intermediate points, and the last waypoint becomes the destination. The path between waypoints is set as an arbitrary shortest path.
Deleting the Trajectory
To delete the Trajectory, click the
Privateelement associated with that Trajectory and the vehicle.Using the right-click on the link, click the
Delete Waypoint
If the number of waypoints is less than two waypoints, the routing Action element will be deleted. Otherwise, waypoints will be deleted in order.
Additional Feature
Z-axis Projection of WorldPosition
If the altitude (Z-axis) value of a placed object is unknown, you can input X and Y axis values with WorldPosition. Then, utilize the Z-axis projection feature in Scenario Runner to generate the altitude value.
project all WorldPosition onto roads
moves object's location onto the nearest road.
Project all WorldPosition onto roads (ignore z-coord)
Moves the object's location onto the nearest road, ignoring altitude differences in distance calculations.
